How To Set Your Suspension Sag
Setup your suspension sag in a few easy steps
When you get your new mountain bike you want it to feel and work its best from the very beginning. Setting up the suspension for your MTB will significantly change how the bike feels, so it’s worth taking the time to get it right.
What is suspension sag?
When you get your new mountain bike you want it to feel and work its best from the very beginning. Setting up the suspension for your MTB will significantly change how the bike feels, so it’s worth taking the time to get it right. This how-to is specifically for air shocks that use air springs. Coil shocks use metal springs, and sag would be set using replacement coil springs.
Why is it important?
Having too little sag will make the suspension to feel too hard. You won’t be able to use all of the suspension travel efficiently as greater forces will be needed to activate the forks and rear shocks. This makes your bike feel too harsh and like your suspension isn’t smoothing out the trail as it should. And it isn’t!
Having too much sag will cause your bike to wallow into its travel. This means that the suspension will feel too soft and that you are using up your travel too easily. The bike will feel sluggish as you will need more energy to get it moving and handling will feel slow and impaired. It could potentially cause damage to your shocks if you bottom them out (use all the travel) harshly.
1What you need
You will need a high-pressure shock pump, all your riding gear which includes your pack and any water that you’d normally ride with, and a wall, table or friend to help.

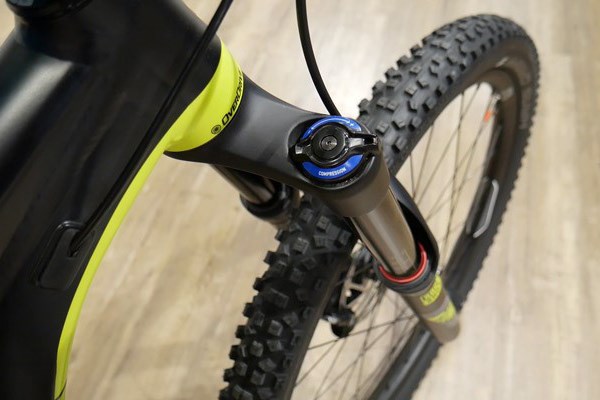
2Fork:
Sag measurement
Generally you want to aim at between 15-30% sag for the forks. Some forks have indicators printed on the stanchions (the smooth part that slides in and out). If your forks don't have, then measure the length of the stanchions and divide by four. This number will be the amount of travel that you're aiming to have the fork sag into when you're on the bike.

3Prepare your fork
If your fork does not have an O-ring on it, you can use an elastic band or a cable tie, but don't forget to remove it when you're done. Next, if you have compression and rebound settings (or a lockout), turn them all off, or to the open setting.
4Starting Settings
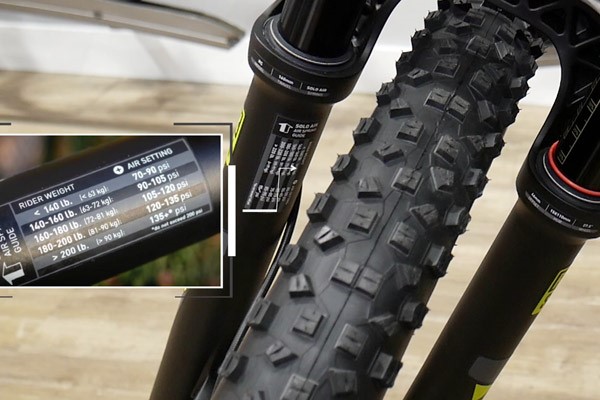
Some forks have the manufacturer's recommended settings on the fork. This will show how much pressure you should pump the fork to for your weight as a starting point. If there are no suggested settings, start by pumping 50 psi into your forks.
5Pump in the air
You will need to remove the cap that protects the air valve. It is normally on the top or bottom of the left fork leg. Screw the pump onto the valve and start pumping. Don't forget to remove the pump before checking the sag measurement.

6Put on your riding gear
Next, put on all your riding gear that's you'd go out with. This includes shoes, helmet, clothes, backpack, and any water you'd ride with. This will more accurately indicate your body weight on the bike, allowing for a better sag setting.

7Cycle through fork travel
Cycle through your fork's travel by pushing vigorously down on the fork multiple times. This will help to break any stiction in the forks so that when you sit on the bike in the next step, the forks with move smoothly into their sag.

8Sit on the bike
This is where the table, wall, or helpful friend comes into play. Gently get onto the bike with all your riding gear. You will need to put both feet onto the pedals, so it helps to have a table or wall to lead against, or in our case a friend to hold the handlebars.

9Get into riding position
With both feet on the pedals and hands on the handlebars, get into the position that you would normally ride in. If you're riding challenging terrain where you're often standing up for descents, then get into a standing-up attack position. This will give a more accurate weight distribution on the bike, so get the correct sag setting.

10Carefully dismount
Now, get off the bike. Be careful not to push down on the bike as much as possible, because this will disturb the O-ring, which is indicating the shock sag setting. It might be worth doing this step more than once to get a correct indication of sag.

11Check sag level
See where the O-ring is sitting. If it shows more than 25% sag, then add some air into the forks. If it's showing less than 25% then let some air out. Repeat Step 9.

12Record setting
Once your reach 25% sag, record how much pressure was needed to get there. This can be used in the future for when you want to reach that level again or if you want to experiment with settings later on.

13Rear shock: Sag Measurement
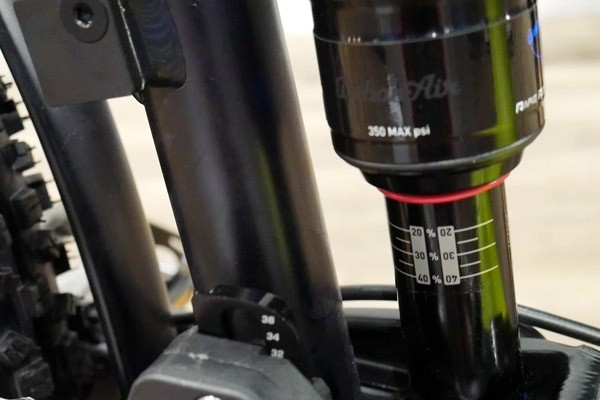
Just like with the forks, some rear shock have a sag indicator on the stanchions (the smooth part that slides in and out) and an O-ring around the stanchion. If your shock does not have sag indicators, then measure the stanchions multiple the length by 0.3 to get the measurement for 30% sag. Rear shocks are usually run at 20-30% sag, with some longer travel bikes running as much as 30-40%, and shorter travel bikes between 15-25%.
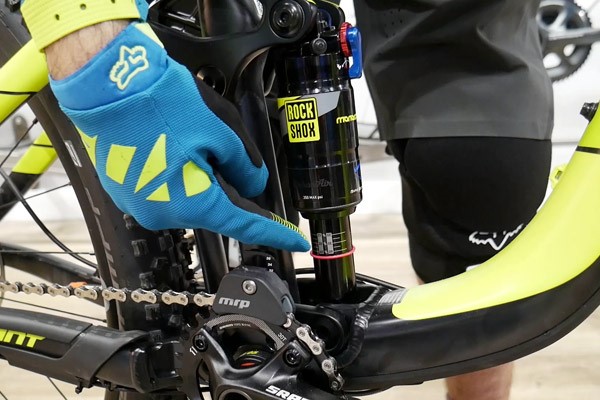
14Prepare your shock
Turn all the compression settings to open, including the lockout if you have one. Put the O-ring to the top of the shock, against the seals. If your shock does not have an O-ring, use a cable tie or elastic band. Don't forget to remove the cable tie or elastic after you've got your sag set correctly.
15Pump in the air
You will need to remove the cap that protects the air valve. Screw the pump onto the valve and start pumping. Don't forget to remove the pump before checking the sag measurement. Some manufacturers will have recommended settings for your weight, so start with these. If not, begin by pumping 100 psi into the shock as a starting point.

16Cycle through shock travel
Cycle through your shock's travel by pushing vigorously down on the saddle or bouncing on the bike multiple times. This will help to break any stiction in the shock so that when you sit on the bike in the next step, the shock with move smoothly into its sag.

17Get on bike in riding position
Get back on the bike both feet on the pedals and hands on the handlebars. Once again, get into the position that you would normally ride in. If you're riding challenging terrain where you're often standing up for descents, then get into a standing-up attack position. This will give a more accurate weight distribution on the bike, so get the correct sag setting.
18Carefully dismount
Now, get off the bike. Be careful not to push down on the bike as much as possible, because this will disturb the O-ring, which is indicating the shock sag setting. It might be worth doing this step more than once to get a correct indication of sag.

19Check sag level
See where the O-ring is sitting. If it shows more than 30% sag, then add some air into the forks. If it's showing less than 30% then let some air out. Repeat Step 17.

20Record setting and go ride!
Once your reach 30% sag, record how much pressure was needed to get there. This can be used in the future for when you want to reach that level again or if you want to experiment with settings later on. Now go out and ride and see how your bike feels!